Installation
Download and Installation of Outbuildings
System requirements
Operating system: Ubuntu 20.04.5 LTS and update version (especially all Linux versions based on the Debian distribution). System architecture: Linux- 64-bit x86. Minimum ~ 2.5 GB disk space to download and install.The memory resources required for analyses using DREPAL-IPCINGSTOOLSKIT may vary depending on the size and complexity of the sequencing data being processed. For small sequencing datasets (size in MB), a minimum of 16-32 GB RAM is recommended. However, as datasets increase in size, or when performing memory-intensive operations, it may be necessary to allocate more memory. The amount of memory required for specific analyses in DREPAL-IPCINGSTOOLSKIT is often influenced by factors such as the number of samples, read depth and genome size.For our analyses, we used a server equipped with the following resources. These included 2TB of disk space, which enabled us to store and manage large volumes of sequencing data efficiently. In terms of memory, we allocated 64GB of RAM, which enabled us to process memory-intensive operations and meet the various computational requirements of the analysis modules. The server was equipped with an Intel Xeon(R) 4208 processor, 16 cores at 2.16 GHz each.
Setup process
Note
if git is not installed then follow the procedure in the following : documentation.
or install git on Ubuntu
sudo apt-get install git-all
To use DREPAL-IPCINGSTOOLKIT, first install it using git for clone repository:
git clone git@github.com:stanlasso/DREPAL-IPCINGSTOOLKIT.git
Note
if you have a version of "Anaconda" or "Miniconda" install ignore the step of installation of Miniconda passed directly to that on the creation of the virtual environment.
Install miniconda
Install as root
sudo su
Download Miniconda
wget https://repo.anaconda.com/miniconda/Miniconda3-latest-Linux-x86_64.sh
Execute the Miniconda script to install it
bash Miniconda3-latest-Linux-x86_64.sh
once the execution is finished, close the terminal then reopen it, switch to root mode once more and activate the basic environment.
sudo su
Entered in the repository clone
cd DREPAL-IPCINGSTOOLKIT
Creates an environment for bioinformatics analysis
conda env create -f environment.yml
Deactivate conda env
conda deactivate
Creates an environment for hosting front-end solutions
Install virtualenv
apt install python3-virtualenv
Warning
use the command above if your version of "python3" is higher than 3.8 if it is lower than 3.8 use the command below.
to check the version of Python use the command :
"python3 --version".
If your Python < 3.8 :
apt install virtualenv
Create env with virtualenv :
virtualenv myenv
Activate myenv :
source myenv/bin/activate
Install all dependencies :
pip install -r requirements.txt
Note
if you get dependency errors such as "ERROR: could not find a version that satisfies the requirement packagename==x.x.x", use nano or a text editor to delete the line containing the package name in requirements.txt, then run the above command again. Once the installation of the packages is finished, check that the missing packages (removed from the requirements.txt) have been installed, as they depend on other packages with "pip freeze"; if they have not been installed, use the command "pip install packagename".
Creates all missing directories
bash makedir.sh
use the tree command to check that you have a file structure similar to the following:
APP/data/
├── Annoted
│   ├── AnnotatedFILEbyFILE
│   │   └── singlefilerepport
│   └── report
├── Bam
│   └── Mapped
│       ├── BamFreebayes
│       └── BamGATK
├── chromosome
├── combined
│   ├── 3d7_hb3.combined.final.vcf.gz
│   └── 3d7_hb3.combined.final.vcf.gz.tbi
├── Datafastq
│   ├── Fastqc
│   ├── KDSD
│   ├── ResQC
│   └── unmapped
├── freebayesfile
│   ├── Filterring
│   │   └── mergefile
│   ├── mergevcffile
│   ├── metrics
│   ├── txtfile
│   └── vcffile
├── gatkfile
│   ├── Filterring
│   │   ├── generation.sh
│   │   ├── MATRICE
│   │   ├── MatriceSNPS
│   │   ├── matrix2.sh
│   │   └── mergefile
│   ├── mergevcfile
│   ├── metrics
│   ├── recal
│   ├── textfile
│   └── vcffile
├── intercep
├── Reference
├── Sam
├── variants.bcftools
│   ├── Filterring
│   │   ├── filteredType
│   │   ├── generation.sh
│   │   ├── MATRICE
│   │   ├── MatriceSNPS
│   │   ├── matrix2.sh
│   │   └── mergefile
│   ├── mergevcffile
│   └── metrics
└── variants.varscan
    └── Filterring
        ├── generation.sh
        └── matrix2Var.sh
Activated the conda environment
conda activate NewENV
Starting the streamlit server
Streamlit is a Python framework that simplifies the deployment of web applications. It is used to host the front end of DREPAL-IPCINGSTOOLSKIT.
Use the following command to start the server :
streamlit run APP/app.py
In your web browser
Open your browser and paste the link below in the search bar.
http://localhost:8501
Note
If you want to use the app with several people on your local network, you can continue with the following configuration
Deploy DREPAL-IPCINGSTOOLSKIT for many users
example of a schema for deploying DREPAL-IPCINGSTOOLSKIT on a local network :
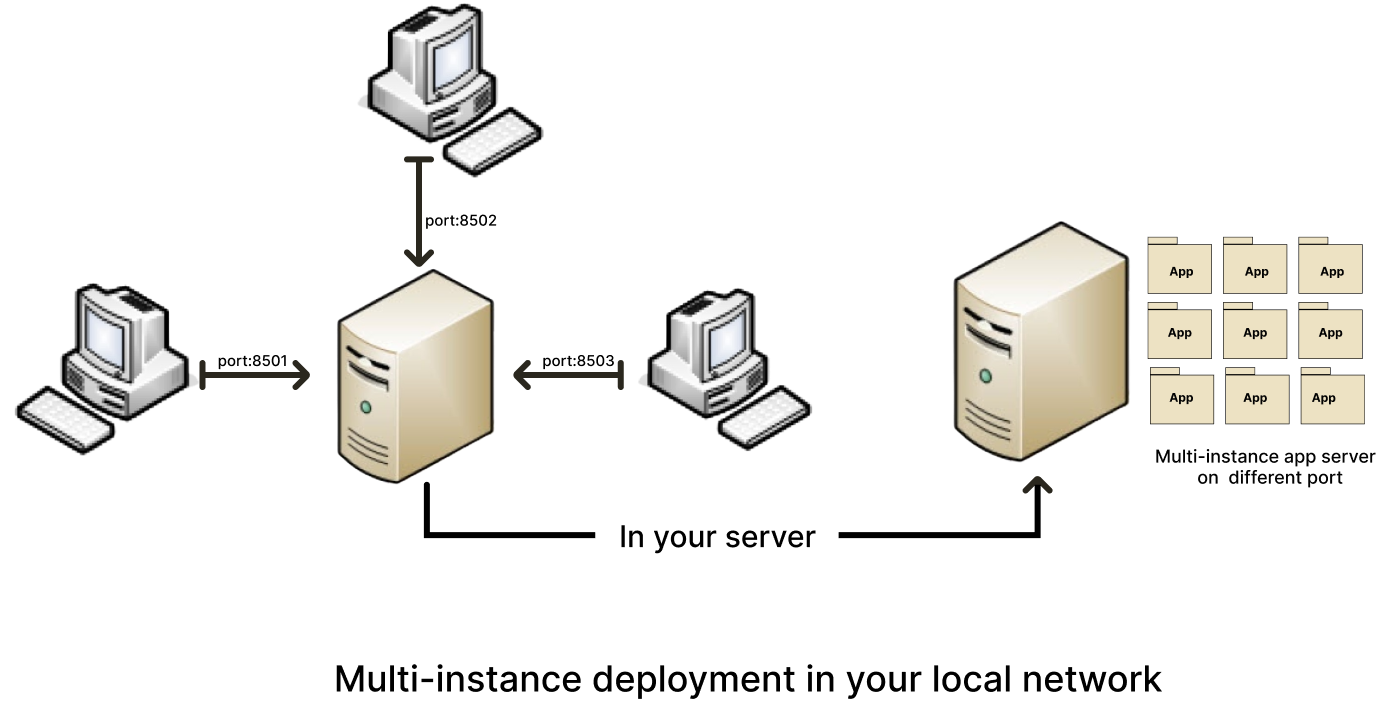
Step 1 : Creates many instances
creates several instances of DREPAL-IPCINGSTOOLSKIT on your server (duplicate and rename) example for three instances:
"DREPAL-IPCINGSTOOLSKIT8501" "DREPAL-IPCINGSTOOLSKIT8502" and "DREPAL-IPCINGSTOOLSKIT8503". 8501.8502 and 8503 will be the ports allocated to these different instances.
Step 2 : Assign a unique port to each instances
change the default port in the "DREPAL-IPCINGSTOOLSKIT/.streamlit/config.toml" file
"(port = 8501) and (serverPort = 8501)" to the port you choose for the instance you are configuring.
Step 3 : Create SFTP server on your server
Instal ssh
sudo apt install ssh
Enable and Start ssh
sudo systemctl enable ssh
sudo systemctl start ssh
check that your ssh is activated**
sudo systemctl status ssh
Create sftp group
sudo addgroup sftp
Create sftp user for each instance : example for user 1
sudo adduser sftpclient1
the number of instances of DREPAL-IPCINGSTOOLSKIT must be identical to the number of users to be created.As in the example above, if "sftpclient1" is the first user, the next users will be "sftpclient2", … "sftpclientn" or n is the last user.This will apply to future orders :
Add users to the sftp group : example for user 1
sudo usermod -a -G sftp sftpclient1
Create the access directory for each user : example for user 1
sudo mkdir -p /var/sftp/User1/Upload
sudo chown root:root /var/sftp/User1
sudo chmod 755 /var/sftp/User1
sudo chown sftpclient1:sftpclient1 /var/sftp/User1/Upload
Open the ssh configuration file and add the following lines for each user created : example for user 1
sudo nano /etc/ssh/sshd_config
Paste the following lines at the end of the configuration file : example for user 1
Match User sftpclient1
       ChrootDirectory /var/sftp/User1
       X11Forwarding no
       AllowTcpForwarding no
       PermitTTY no
       ForceCommand internal-sftp
Restart your ssh
sudo systemctl restart ssh
Step 4 : Run app :
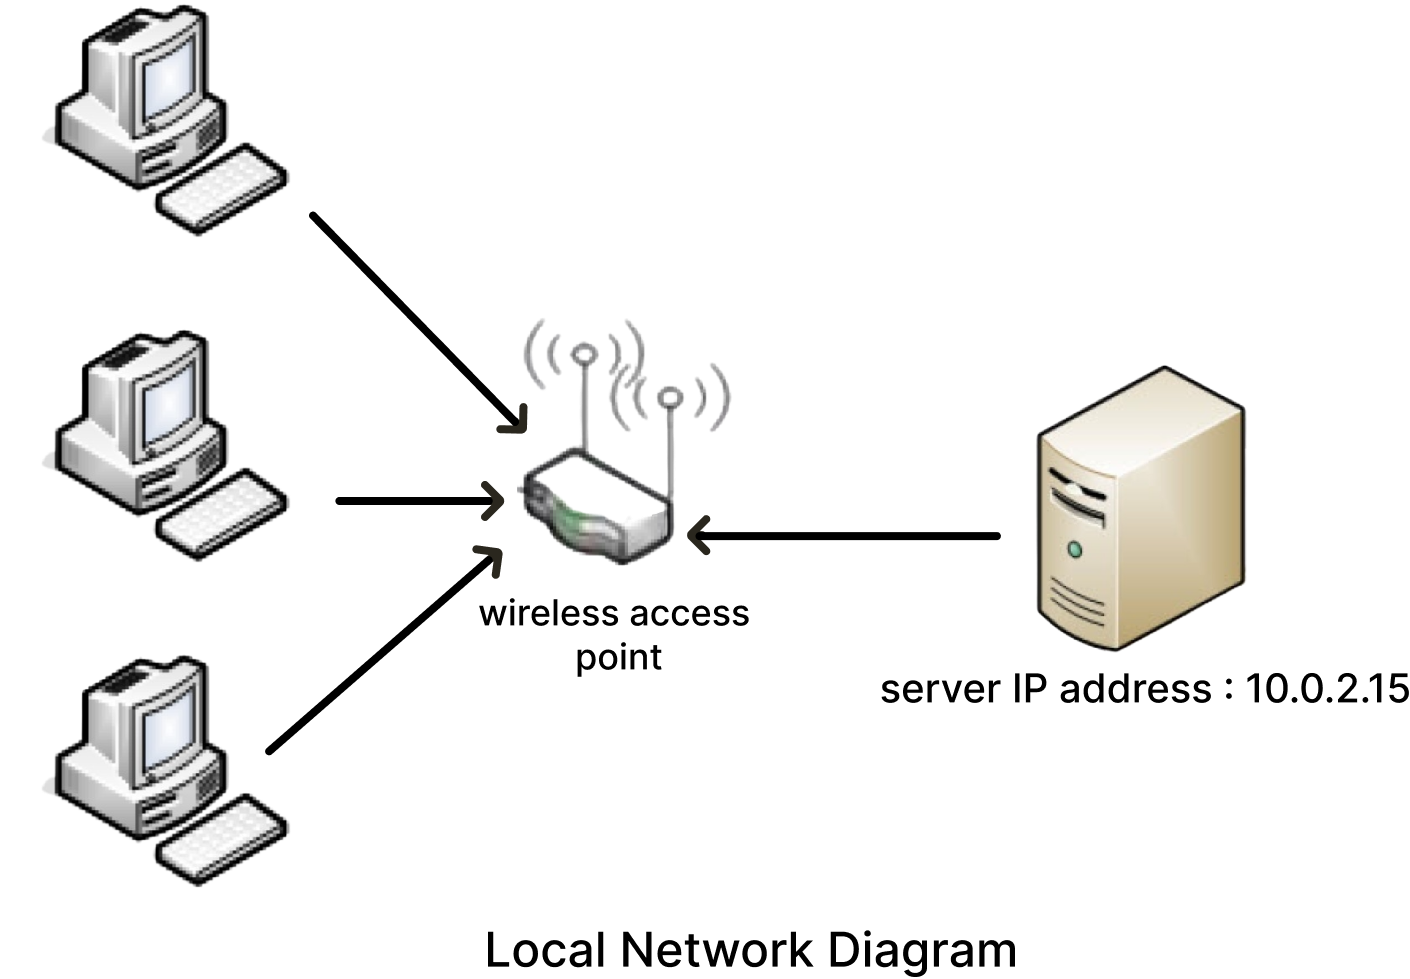
Our LAN (Local Area Network) for the test
Run all instances
Open terminals equivalent to the number of instances and in each of them activate the conda and virtualenv environments then launch each of these instances via "streamlit run APP/app.py".
Access to the server from your local machine
To enable users to access the application from their local machine, they will paste the following link into their browser: “http://serverip:port” to obtain the server’s network address, type the “ifconfig” command on your server. In the example in our diagram, client machines will access DREPAL-IPCINGSTOOLSKIT by typing the following link into their browser: http://10.0.2.15:8501 if this port (8501) is not assigned to an instance currently in use. Don’t forget to give the ssh parameters associated with each instance to the user example for user 1:
the host: sftpclient1@10.0.2.15
The user name: sftpclient1
Password: : ****
the default ssh port: 22
The ssh access information for each instance is very important for users.
Warning
For this type of multi-instance configuration, we recommend that you have a robust infrastructure.